Here’s how you can build the next Uber-like App!

Heres how you can build the next uber like app

Here’s everything potential on-demand businesses need to know to develop an app like Uber!

Taxi apps are just snowballing everywhere. There was a time when Uber was the only online taxi provider company in the market. But if we look at the present-day situation, so many small and medium scaled online taxi provider companies have been introduced in the market. New apps have sprung up to enrich people’s experience of boarding taxis online. However, out of the lot, Uber still manages to show incredible success.

According to Statista, Uber’s global presence has increased extensively over the last three years. The total value of Uber bookings has more than tripled since late 2016, reaching over 40.7 billion U.S. dollars in the first nine months of 2020.

Table of Content:

In the peer-to-peer ride-hailing market, Uber is in charge of 77% of the business. Many of its competitors have tried to pit against but Uber still manages to reign. How? In this blog, you will figure out exactly what makes an app like Uber stand out from others in the market and how even you can benefit from the Uber business model. Remember that the core objective is not to create an Uber knock-off, but rather a more advanced web & mobile app.

How Does the Uber App Work?

uber app flow

Before getting into the technical aspects of how to create an app like Uber, let’s first briefly review how the app works and what are its core features.

If anything that makes Uber the sole winner in the market, it’s the way the app operates. If you have ever used the Uber app (which we’re pretty sure you have) you’ll know that it takes only a few simple steps on the app to get to your desired location. The app keeps the process far efficient and plain sail. That is why if you want to develop an app like Uber, you need to first understand what these steps are:

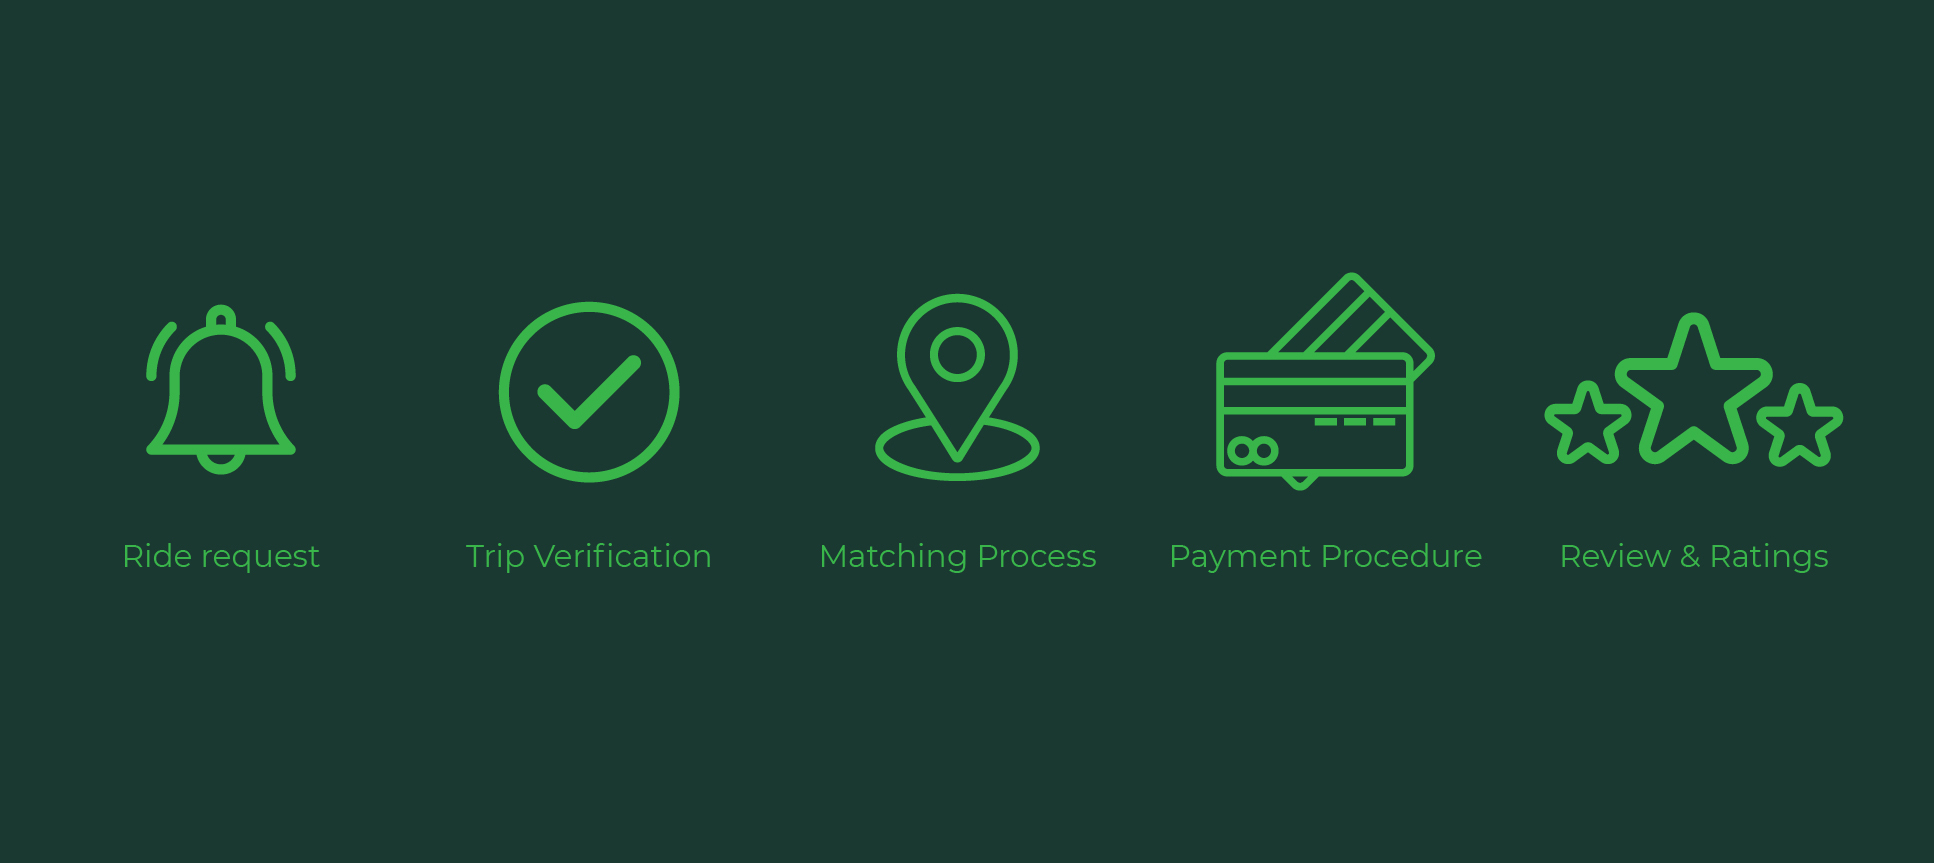
  • Step 1: Ride request

The customer creates a trip request to their desired destination. They check the fare of the trip and choose between various car types.

  • Step 2: Trip verification

The request is then sent to a nearby driver whoever will be able to pick up the customer as quickly as possible. The driver can either accept or reject the ride. If one rejects, the request is quickly sent to another driver.  Each other’s contact details are shared with both parties.

  • Step 3: The ride

Once the contact details are shared, the customer tracks the taxi approach and can see the estimated time of arrival.

  • Step 4: Payment

The app gives you an exact estimation of the ride cost beforehand which makes the process even easy and smooth. The process by which the Uber app calculates the trip fee is through time and distance indicators.

  • Step 5: Rating and Review

Once the ride is complete, the app requests you to rate each ride. This may help future riders pick drivers accordingly.

How many apps are involved?

apps involved

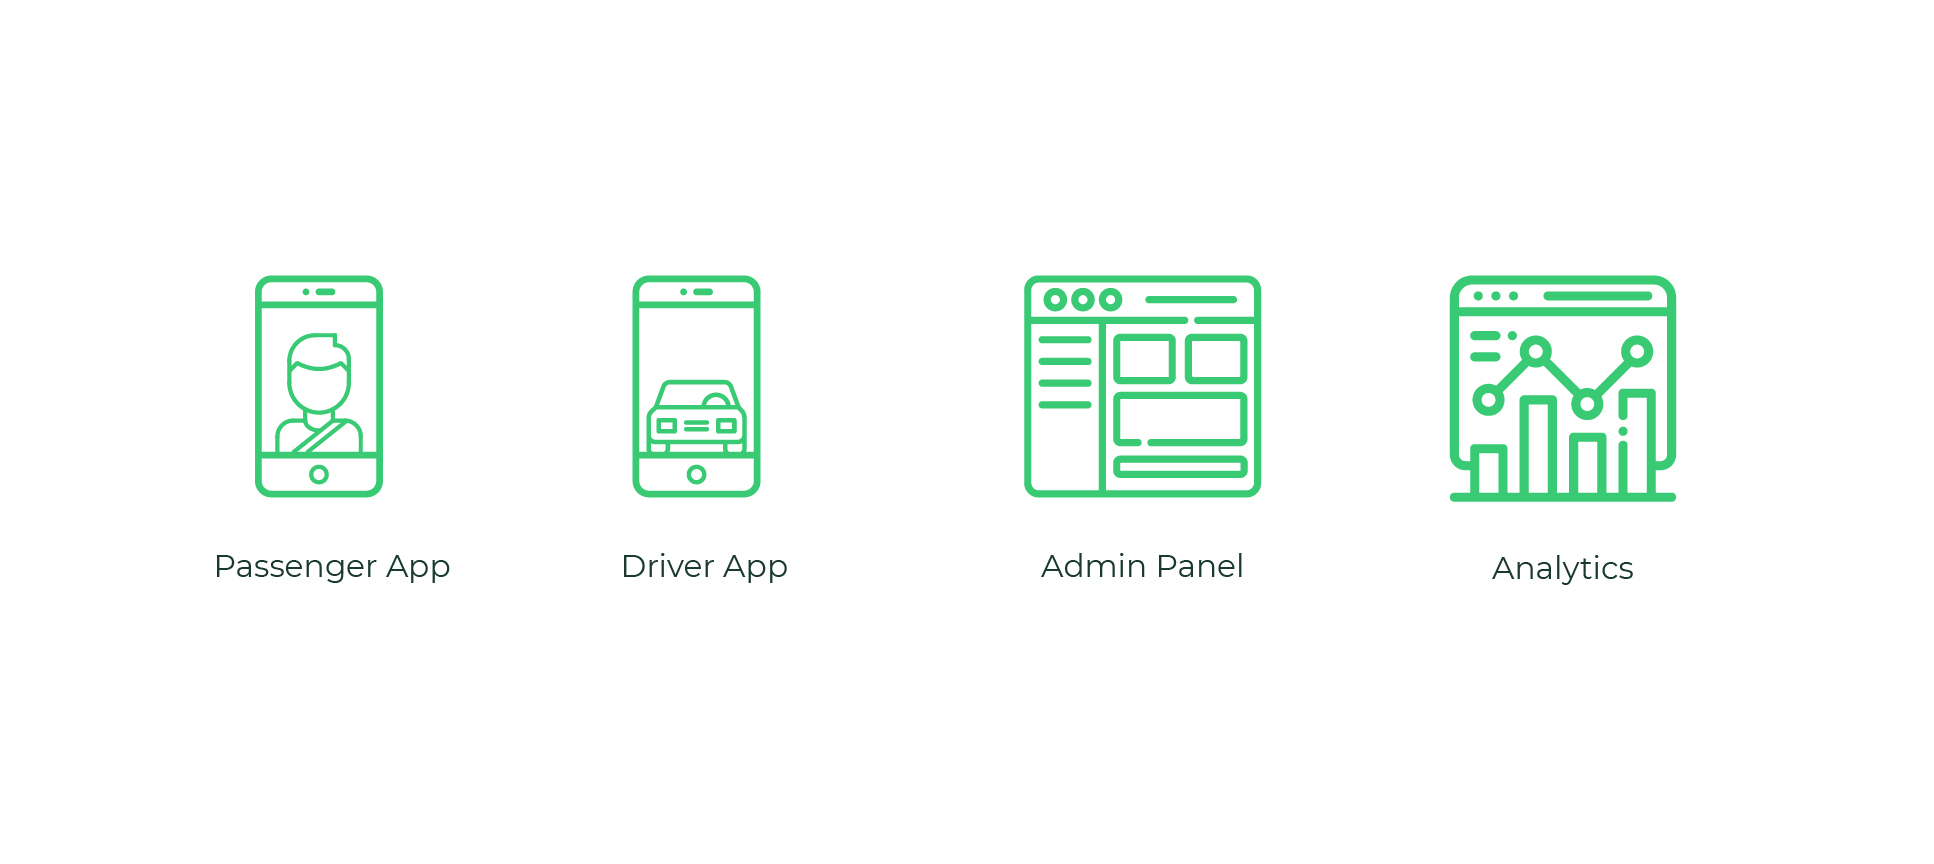
Contrary to what most cab-hailing app owners assume, Uber is not a single app but a company that runs three distinct apps. The original platform comprises a Driver App designed for the drivers collaborating with the company and a Passenger App meant for ordinary customers who book their ride. Apart from that, the platform should also come with an admin panel that is responsible for managing and monitoring the platform’s work.

If you want to make an app like Uber (or a similar taxi booking app), it is crucial to understand these three major components that make up this whole system.  Let’s understand the basic features of each of these applications in detail.

Also Read: From Idea to Product: A comprehensive guide to the product design process

Passenger Features in Apps Like Uber

Uber App Features for Passengers
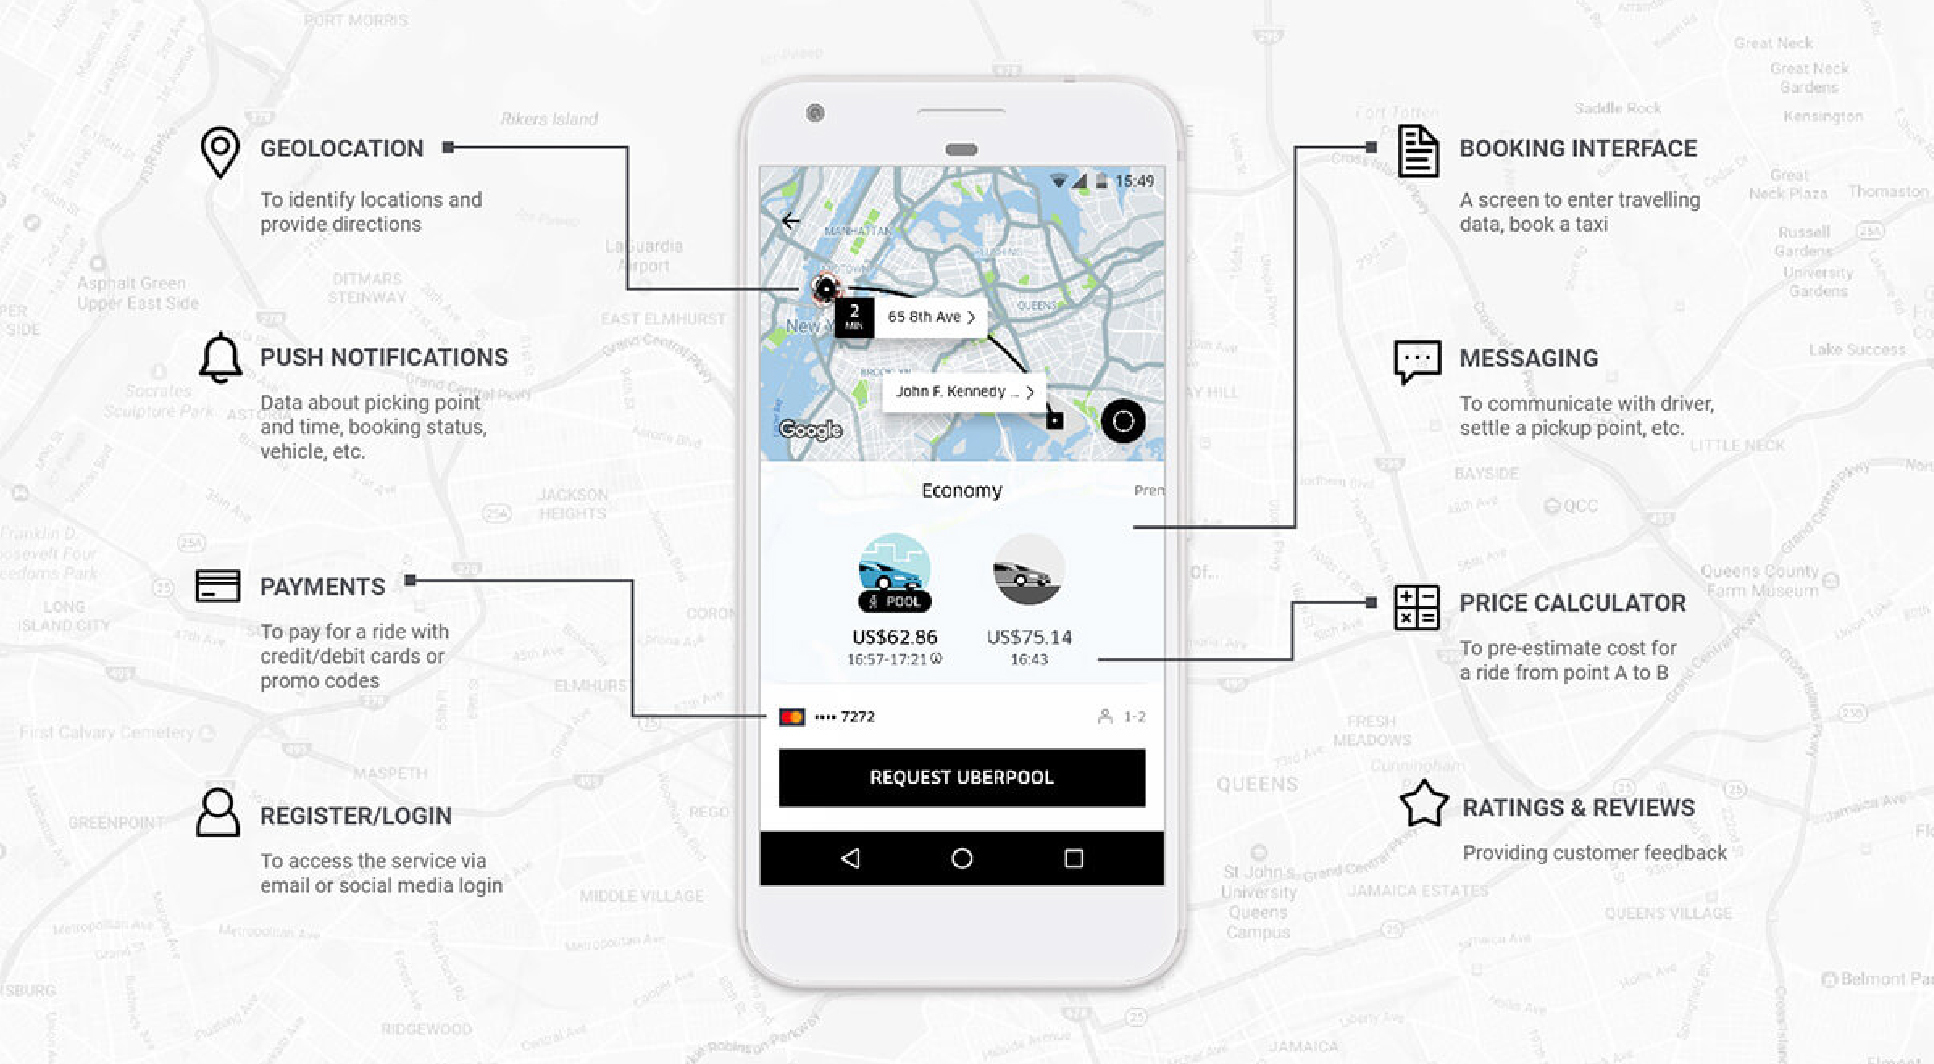
  • Registration – The user is asked to log in or sign up as soon as they download and open the app. This can be possible via email, social media, or phone number for verification.
  • Taxi Booking – This feature allows users to enter their address, select the type of car, and adjust the pickup location.
  • Fare Calculator – As mentioned above, the fare for traveling from one point to the other is already calculated based on the distance, the car-type, and estimated traffic. The price is shown to the customer beforehand.
  • Driver Tracking – The driver’s movements are tracked in real-time and timely updates on travel routes and estimated time of arrival are sent to the customer.
  • Texting or Calling the Driver – As soon as a driver is allotted, their contact and vehicle details are sent to the specific customer. The customers can then easily contact the driver to stay up-to-date with the trip-request status.
  • Travel History – Provides a track of record of the driver’s past rides and transactions.
  • Payment – Various payment methods including credit and debit cards, PayPal, gift cards, or simply in-cash can be implemented through the app. Once the ride ends, the selected payment method is charged.
  • Rating & Review – The customer can provide ratings based on the journey, driver’s behavior, and the overall experience.
  • Customer Support

Following are some advanced features that can be included in a subsequent version of an Uber-like app:

  • Ride Cancellation – Allows users to cancel the ride within a specific period.
  • Split Payment – Riders can opt for sharing a ride with other passengers and split the payment.
  • Book for Others –  This feature lets a user book a taxi for someone else.
  • Share My Trip – With this feature, one can share their trip details with contact.

Driver Features in Apps Like Uber

  • Driver Verification – This gives the complete information of the driver including his verification, license, documents, etc. This feature is also used to check the driver’s availability.
  • Trip Alert – This notifies the driver when a new trip request is placed including the passenger’s location, route, and travel history. The driver has the ability to accept or decline the request.
  • Push Notifications – These are used to notify any change in route, pick up location, or request status.
  • Navigation & Route Optimization – Shows the best and fastest trip route with the integration of Google and Apple Maps.
  • Revenue Reports – Provides information about the driver’s trips and earnings, allowing them to look up statistics on daily or monthly earnings.
  • Texting or Calling the Passenger –  Allows direct communication between the driver and the passenger within the app.

Apart from the above mentioned basic features, an Uber-like app can also have some of the following advanced features:

  • Driver Destinations – the ability of a driver to select a ride only with a preferred destination.
  • Quest Earnings – the ability of a driver to earn more for completing a predefined number of trips.
  • Waiting Time – the app charges extra to the passenger in the event of trip cancellation or exceeding the wait time of 5 minutes.
  • Forward Dispatch – allows the driver to accept another trip request while performing the current ride.

Admin Panel for Taxi Booking Apps Like Uber

admin panel

The Admin Panel works as a Fairy Godmother to the whole system making sure every component is organized and is under control at the driver’s as well as the customer’s side. It is a control panel for admins to manage customers, drivers, requests, payments, and everything else that comes in-between to function an app like Uber.

Hence, the admin panel must include some high-level set of features including:

  • Managing the locations & fares charged;
  • Managing the User & Driver accounts;
  • Taxi Booking Management;
  • Reviewing the ratings;
  • Push notification management;
  • Promotion and discounts;
  • Customer and Driver support;
  • Integration with multiple analytics tools (like Google Analytics) Integration with Google Analytics

What Technologies are Used to Develop an App Like Uber?

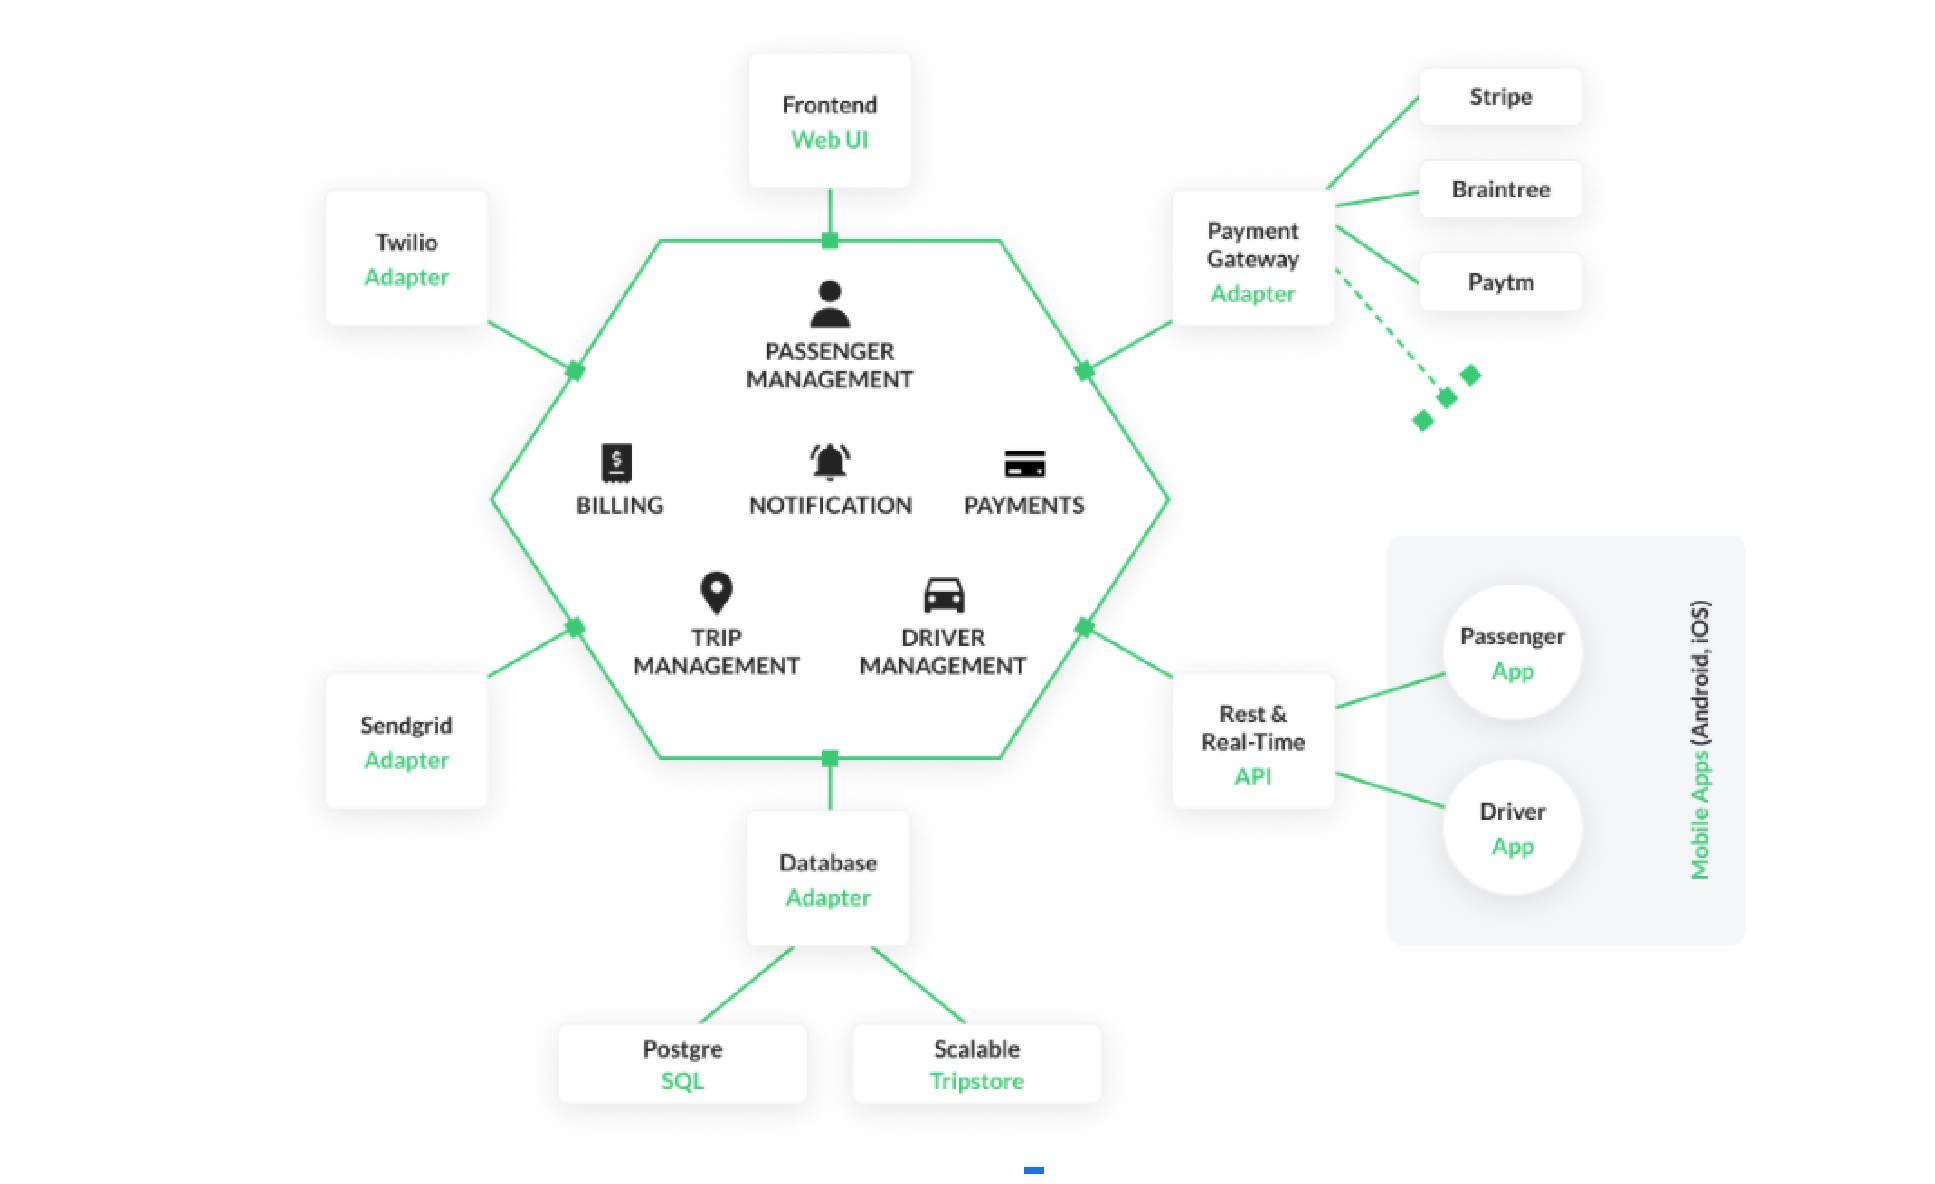
In this part of the blog, we’re going to discuss the technical aspects of building an app like Uber. What are the key technologies that can play a pivotal role in the development of your Uber-like app? What are the technical integrations that you might need during the taxi app development?

The most important technology that is used in any taxi booking app is Geolocation. Other key features include push notifications, integration of payment gateways, and route building.

Below is an overview of all technological integration with the time (in hours) taken to  develop the following in-app services:

Technologies used to build an App Like Uber

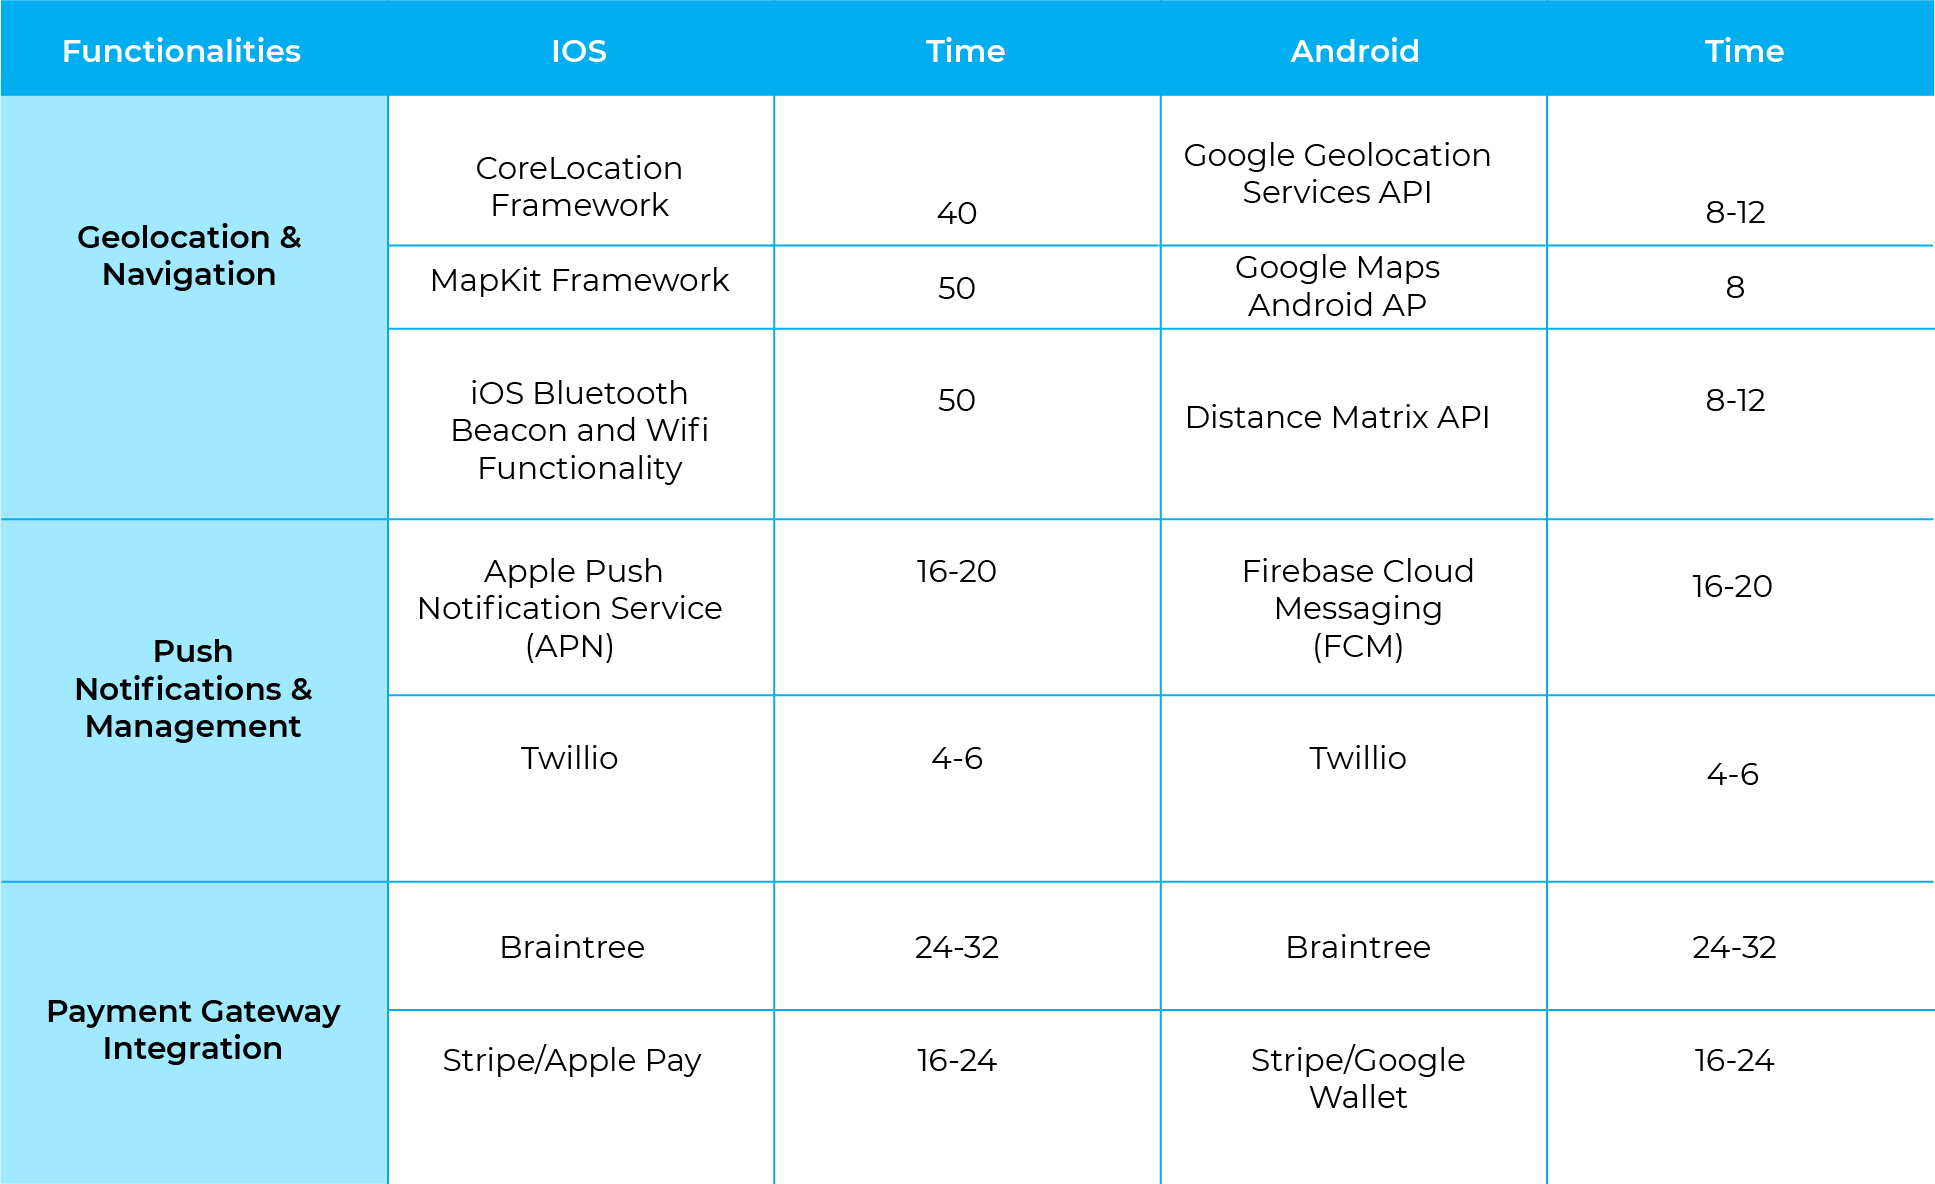
Besides the above technological integrations, the development also requires you to implement other technology and programming languages for both iOS and Android app development. Most taxi app developers would apply Swift and Kotlin programming languages for iOS and Android apps evenly. As for the system’s backend, some of the top taxi app developers highly commend the Ruby-on-Rails framework.

How much does building an app like Uber costs?

Now that you have a perfect idea of how you can develop an app like Uber, you may ask “How much does it cost to make an app like Uber?”. The cost to make an app like Uber can be expensive if you consider an in-house team to build it. Therefore, we strongly recommend you to go for a mobile app development company that understands the rhythm of the market and avail the best methodologies to develop apps.

According to BuildFire, hiring an offshore development company could cost you as low as $25 per hour. To give you an overview here is the average hourly cost of skilled developers in the top three major countries:

  • USA: $150-120/hr
  • UAE: $90- 150/hr
  • India: $25-49/hr

Hiring a mobile app development company can help you deploy the latest technologies and the best of features to your taxi app development.

To Conclude

One thing is for sure, to develop an app like Uber is indeed a considerable and profitable idea. Keep in mind that apart from using your app to book a taxi, your audience also demands a sleek user interface and a smooth experience. Hence, you need to pick and customize your app structure suiting those needs – and at the same time, your budget. We’ll be glad to help you decide how to create an app like Uber and launch it in the market with minimal time and financial resources. Write to us at [email protected].

How to turn your app idea into reality?

how to turn your app idea into reality

Cheers! You have a great app idea but how to turn your app idea into reality?

With the app economy booming, this is the best time to transition your vision for an app into a full-fledged reality. The user base is growing so is the spending on mobile apps.

Source: Sensor tower

This provides a great opportunity for entrepreneurs and enterprises to nudge into the greatest mobile trend of all times!

But it isn’t as easy as it looks. Once you’re at it, you might find yourself mystified in the process. What should you do? How to get from A to B or B to C? Where to start from?

You’re not the only one asking these questions. Often it’s hard to know where to start from, especially if this is your first time making an app. At Spark Eighteen, we master in providing you solutions to these problems. Here is a step-by-step guide that can help you on how to turn your app idea into reality:

Don’t stop researching!

There is already a surfeit of poorly planned apps that fail within weeks because they do not research well. You would not want to imagine your app among these!

Once you have your basic idea at hand, the very next step is to check if the idea in itself is viable. Below are some of the questions you need answers to:

  • What are the problems that you’re solving through your app?

If there isn’t any problem for which your app is the solution, your product will basically remain non-existent.

  • Is there a market for your app?

Research online industry journals run a search on Google Trends, conduct keyword research, talk to industry experts – gather as much information you can about your potential market and your ability to scale an idea here.

  • Who is your competition?

There can be similar apps in your space that are targeting the same problem and users as you are. Search who they are, check what they’re doing, read online reviews, and run through their social media handles. Collect all this data and analyze the expectations for an app like this and what you can improve upon as you build your own app.

  • Who are your users?

Identify your target audience and define your user persona. Uncover how do they tackle the identified problem today, how satisfied or dissatisfied are they with the existing solution, and how is your app going to improve this for them?

Create a basic outline for your idea

Once you are done with the nitty-gritty, it’s time to sketch your app together with a wireframe which is one of the most important elements when answering the question of how to turn your app idea into reality. Your wireframe is the draft of your app’s main architecture. Don’t get carried away making all the design choices just yet, rather stick to the main fundamentals or features of your application. Create a detailed and specific outline of how things are going to work and what pages and functions are needed. Before jumping on to design, keep going back and forth to find if there is any snag in the navigation or screen layout. Move ahead only when you’re satisfied with your wireframes.

Get your app designed

The sketch is ready, now it’s time to color it! This is a super important step as this will decide if your users will stick to using your app or will just delete it after one use. So it’s wise that you don’t rush or skimp through this process. Start by sketching the user interface (UI) for your application. There are various options for how you can go about it as you can either use a paper or a software tool that lets you create mockups for your app. Decide what colors, fonts, and design elements you’re going to use for your app design. Since this is such a crucial step, even a small misstep can create a big problem. We’d recommend you to hand this to a team of designers or programmers with enough technical knowledge or experience to get your product designed faster.

Time to launch and market your app!

Source: Statista

Now that you have your fully-functioning app, it’s time to put it to the test. Make sure every aspect of your app is functioning properly and is visually appealing. Before revealing your masterpiece to the world, run beta testing of your product. This means launching a beta version of your app and making it available for early-adopters. This way you’ll know how your app performs in the live environment and how the audience reacts to it. Collect valuable feedback and use it to improve your app.

After planning, designing, and testing finally it’s time to hit the shelves! But publishing your app to either the App Store or Google Play Store doesn’t end your job.  The more complex part is to put the word out there. Without proper marketing, your app will hit the pile of apps that nobody pays attention to. Use the power of social media ads, influencers, or email marketing to spark a conversation about your product.

Lastly, don’t forget to listen to user feedback. Keep improving and updating your app regularly to give users the best experience.

We hope this blog helped in simplifying a very complex process. But again, app development is an ongoing affair that will continue even after the initial launch of the product. This is why you need the best team by your side. Spark Eighteen is a professional team of designers that provide mobile app development services to companies across different industries. Feel free to contact us here.

3 Easy steps to build a successful Minimum Viable Product (MVP)

3 Steps to build a successful MVP

How to build an MVP that validates your startup idea? What is the process of MVP development? And, how can it help you make a splash in your industry with less time and costs?

If you’re searching for answers to the questions above, you landed on the right page!

Table of content:

  1. Identify Your MVP’s Core Features
  2. User Testing
  3. Release and Keep Iterating

It may look like apps like Airbnb and Uber have rushed into our lives at full tilt and immediately gained global recognition with millions of users. However, only a few people would remember that these apps didn’t start as polished as they are today. The businesses that they have grown out to be today,  it’s almost difficult to imagine that once they were undeveloped apps too. And it is even more difficult to imagine how succeeded exactly due to gradual growth.

If you’ve read about Eric Ries’  ‘Lean Startup’ methodology, you must know how widely it is used all over the world. It is aimed towards shortening the development cycle and building startups according to the needs of the early customers in the international to reduce risks and outlays.

In today’s IT industry, developing an MVP is a basic practice. It is considered to be useful in the planning and building of a product. So if you’re planning to launch your own product, here’s how to build an MVP to quickly test and validate your idea!

What is an MVP?

Before we list down the benefits of an MVP and how you can build one for your startup, let’s first understand what exactly it is.

A Minimum Viable Product (MVP) is an initial product with a minimum set of features that solves a definite problem of the users. The basic set of features are enough to attract early-adopter customers and validate your value proposition.

Eric Reis, the person who introduced the concept, says:

minimum viable product

A startup may decide to develop and release an MVP because they want to:

  • Introduce the product as quickly as possible;
  • Test if their target market is actually ready to adopt the product or not;
  • Learn about their target market through feedback.

Also Read: From Idea to Product: A comprehensive guide to the product design process

Benefits of Building an MVP

In today’s competitive business landscape, an MVP can help you provide immediate value to your customers while also minimizing development costs. By gathering data and feedback, businesses can then improve future iterations of the product.

Below are 5 major reasons how building an MVP can benefit you:

  • User-Focused Design Approach

An MVP is developed to solve a user’s key problem and is constantly iterated as per the user’s needs. It gathers valuable feedback constantly to provide an improved version of the product at each iteration.

  • Immediate Testing

By offering the core set of features rather than a fully developed product, organizations can easily establish if their product’s concept resonates with their target audience or not. Based on the findings, it further provides an opportunity to make changes. An MVP also helps businesses identify which social group, in their target audience, are the most active users and how they interact with the product.

  • Developing Early Relationship With Customers

The immediate goal of a business is to build trust with their existing customers while also connecting with the new ones. It’s no secret that timing plays an important role in developing that relationship. An MVP helps in engaging early adopters and stakeholders during the initial stage of the development process. These early users will then spread the word about your product and also give valuable feedback. All this nurtures the relationship between a business and its customers.

  • Protects Credibility

An MVP is the true image of your product shown to the public. You build an MVP to explore the market and your target audience before making the actual commitment to investing a fortune into it. So even if it fails, it will fail quickly – without you spending too much money. This is a better business idea than pouring in a big amount of your budget into a project that fails within a year – and trust us, you won’t like that.

How to build an MVP in 3 easy steps:

1. Identify Your MVP’s Core Features

The first step to MVP development is finding out what features you want to include in your early product? These are the core features that are going to be the identity of your product. This is how you’re going to make a mark in the market. Start off by answering the following questions:

  • What are the problems of your users that you’re trying to solve with your product?
  • How are they dealing with the existing problem today?
  • How does your feature help them tackle the problem in an easier way?
  • Which of your product’s features are ‘needed’ and which of them are ‘wanted’?

There is a big difference between a product needing the feature and wanting it. Features that are ‘needed’ are the ones a product cannot exist without. For example, Uber’s location tracking feature. Without it, a user won’t be able to provide their exact location to be picked up, hence the app will be of no use.

On the other hand, features that are ‘wanted’ are unique and are able to convince users to try out your product. A user able to change their location or able or see the contact details and past history of a driver who is picking them up are useful features that can help your MVP stand out from others in the market. If you’re unsure about if a feature will be used or how often it is going to be used, it is likely to be a want and not a need.

In order to make a great MVP, you do not only cover all the needs but also a good number of wants to validate your product idea. It highly depends on your business and your product to identify what is the right amount of features they want to target.

2. User Testing

Now that you have your MVP’s core features listed, it’s time to identify and find out if they are worth to be included in your final product. How do you find out if the user really ‘wants’ or ‘needs’ that feature? How do you know which features are worth investing in or which are not? That is why we recommend user testing using as many mediums as you can. While doing user testing, don’t forget to include the core features you want to test. Don’t fully invest in these features yet, Instead, create a dummy project and see how many users are interested in it.

dropbox how to build an mvp

This is how Dropbox’s founders got the answer to the simple question – “Will anybody use this?”

3. Release and Keep Iterating

The whole idea behind an MVP is to release early and keep adapting to users’ feedback. As soon as you release your MVP, keep iterating by including features as per users’ needs. You’re likely to iterate for quite some time before it is fully ready to go to the market.  Find those crucial features that are tested, validated, and loved by your target audience and make them the main focus of your product. You may need a couple of MVP’s combined before you release your final product in the market. The moment at which you’re ready to launch the final product is called the Minimum Marketable Product (MMP).

In essence, an MVP aims to allow a business to quickly release its product out in the market with just the essential features and minimal investment. As you constantly iterate and build multiple MVPs to create an MMP, you’ll be able to build a product that is validated and thoroughly tested.

To Conclude

A good MVP is like a pilot that doesn’t sacrifice the overall vision of a product. Stripping down a product to its core features allows you to see how your audience will perceive it in the market. An MVP allows you to develop flexible business models according to customers’ needs.

This easy step-by-step guide on how to build an MVP will help you maximize your project’s value in front of your customers. All you need to do is plan out your core features and understand your target audience.

Need any help in building an MVP for your next project? Reach out to us here.

From Idea to Product: A comprehensive guide to the product design process

product design process

Designing a product is just not as easy, and it will never be. While companies may come up with unique ideas for their new product, it’s hard to figure out if the final product will be profitable for them or not. Besides, there are various other challenges business stakeholders face like, figuring out their target audience, the business goals to satisfy, and which branding messages to convey through the product. This is even harder during the early stages of the product design process, as business strategies tend to evolve which disturbs the entire product development life cycle. This makes product designing a complex process that needs to start with the right plan and objective to make something that succeeds.

Table of content:

  1. Brainstorming Ideas
  2. Idea Screening
  3. Feasibility Study
  4. Prototyping and Testing
  5. Product Launch & Iterating

Know that the process of new product design has many steps and iterations from beginning to end. To better understand it, here is a step-by-step guide to the product design process:

1. Brainstorming Ideas

Any product design process starts with brainstorming ideas for the product. This begins with first understanding the customer and what they are looking for. Based on this, companies pinpoint a variety of possible solutions and ideas that can answer those needs. There are a number of sources that can help you generate ideas for your new product. Some companies choose to have internal brainstorming sessions where they assemble their team and get ideas on the floor. Some take advantage of outside sources such as consumer trends, web forums, market environment, crowdsourcing platforms, etc.

Idea generation can begin with a hyper-local situation and can even branch out to a global one, but it needs to start by identifying a bonafide customer need. Make sure your final idea have relevant answers to questions like:

  • Who is your customer?
  • What are their needs that your product can satisfy?
  • What business goals you have to satisfy through the product?
swot analysis product design process

2. Idea Screening

Now that you have a list of potential new product ideas ready, it’s time to vet every one of them. Decide which ideas to pursue and which ones you can discard. This is an important step as it will help you avoid unnecessary expenses to move forward with the design process. Assemble or send out surveys seeking feedback from your team to review and evaluate the ideas. What are the ideas that meet the company’s needs? Will they be able to fill the existing gap between the customer’s problem and the solution? What will be the potential impact on the profits? Answering these questions will allow you to avoid any extra cost on unnecessary complex ideas.

The criteria for identifying the right ideas are different depending on the project and the industry. Often, ideas are screened through focus groups and user studies. They are then ranked in order of desirability and creativity. Alternatively, a more formal discussion about each idea is performed examining the pros & cons and other important details that are enough to decide whether the idea should be considered or not.

3. Feasibility Study

Once you have refined ideas that are more suitable for further considerations, it’s time to take the market analysis followed by the economic, technical, and strategic analysis into account. A feasibility study is a process that takes all these relevant factors and discerns the pros and cons of the product before investing in it.

Market analysis will help you look at the bigger picture of the product market that will assess whether or not there is enough demand and if the idea should be considered. If there is adequate demand for the product, an economic analysis is performed which allocates the cost of production and development and compares them against an expected sales volume. Product profitability and return on investment are also included in this analysis.

Once it’s done, comprehensive technical and strategic analyses take place. They are concerned primarily with the viability of the product including technology, manufacturing process, and availability of product materials. Products that pass the feasibility study are ready to move to the next step in the design process.

4. Prototyping and Testing

It’s time to test your product concept by moving into the design and production stage. To test your product design, you will create an actual prototype or a mockup. Run a small-scale release with a set of target customers and generate feedback. This will help you evaluate and identify the areas of improvement to further develop your product.

This will also be a great opportunity to see if your product is on the right track while also working through major technical issues or add requested features. Prepare your marketing team, customer, and technical support, and sales team. Also, determine your pricing strategies and other necessary details.

Think of it as running beta tests for an app.

Constantly test and redesign your prototype until a viable design is determined. Once adjustments are made with constant testing between markets and consumer groups, it’s time to move into large-scale production and the official launch. Continuous testing the product for performance, market testing is also performed to check whether the product will be successful in serving the defined market or user group. This will give you a clear idea of whether customers are interested in what you have to offer and will purchase once it’s officially in the market. Thus, testing is the most critical step in product designing.

5. Product Launch & Iterating

It’s time to commercialize your new product by bringing it into the marketplace. When launching your product in the market, it’s wise for you to only focus on the core features so that your product can simply move forward and start generating sales figures.

When you launch your product, start your production at a relatively low level of volume and increase it slowly as your product starts to gain traction with your audience. Lastly, don’t forget to constantly update and iterate as per growing customer needs. Launching your product doesn’t mean the product design process is over. It’s an ongoing process that continues as long as the product is alive and in use. Look out for ways you can improve it further and iterate as required.

To Conclude

Designing a product is a complex process but it isn’t difficult when you understand the needs and problems of your potential customers. After all, they’re the ones that are going to use it eventually. To design a product that succeeds you need to identify a problem, define the users facing that problem, and deliver the solution. Working with a product development company like Spark Eighteen will help you steer clear of more than half of these tasks to ensure a smooth product development process.

Collaborate with us today and let’s work towards your product development and design!

What does it take to convert a product idea into reality?

What does it take to convert product to reality

Every product that we come across often starts with a mere thought. An entire mix of creativity, innovation, and confidence is what it takes to turn an idea or a concept into a successful product. But how to build a product that succeeds? Product development can be an extremely time-consuming and overwhelming thought process. While some product entrepreneurs succeed with their idea, some wonder as to what went wrong with their product development process.

Spark 18 - Product Development Steps

In case you have an idea or are thinking of building a product, these few tips will come in handy to invest your money correctly into a product.

Keep your Company’s Goals and Vision Clear

You probably don’t want a product without a vision, right? It is highly important to set clearly defined goals and vision for your company that will subsequently be used to underline your product’s existence.

Know What You Aim To Accomplish

While the company’s vision is critical, you must answer these simple questions before executing the product idea:

  • What problem does your product aim to solve?
  • What makes your product so valuable?
  • Is your product idea viable?

If you’ve tried to answer, you’ll know that your product idea needs a lot more consideration and thoughtful approach to its actual implementation.

Be Well-versed With The Market

While it’s easy to get enthralled by your idea and overlook the most important steps in the product development process, you need to have a clear picture of the target market you’re looking to tap and analyze the market size that your product will cater to.

Be sure to gather all the essential information and validate your market before the actual product development process starts. It will also be beneficial to hold focus groups and make a note of all the factors pertaining to them.

Focus On A Simple Idea First And Build A Prototype

Since complex ideas require more time, money, and effort, it is recommended to plan for a simpler and basic version of your product idea making sure that it will solve the targeted vision.

People often spend excessive time in making the perfect product, only to realize that there is no perfect product since there is always room for improvement with technology being involved. It is, therefore, important to understand that product development is an iterative journey.

Creating a product prototype could help you figure out whether your big idea will actually work and succeed. The main purpose of a prototype is to validate the product concept and design before it is actually launched in the market. A product prototype can be anything from a sample, drawing, presentation or the replica of the final product design itself.

Analysis & Strategy Development

Now that you’ve worked on a product idea with a vision in sync with your company and gained an understanding of your target market, you should analyze, test and decide the business and marketing strategies that need to be employed.

This is the time when you need to further refine your product and identify areas of development based on the customer feedback received on the initial product prototype.

With a finalized concept of the product, start focusing on other factors and metrics like the cost to build and market the product, the competition for your product, marketing and branding strategies, break-even point, etc.
The testing results and a detailed analysis will help in reducing the risks and making your product ready for the perfect market launch.

The Cost Of Building A Product

When building a product, an entrepreneur would always try to anticipate the amount of capital it would require along with the other relatively reasonable expenses.

The development journey primarily comprises a development timeline, product/app team, elements to be incorporated, and post-release expenses. A basic app or a website development team would consist of:

  • Project manager
  • Developer
  • UI/ UX Designer
  • QA Engineer

The product development costs largely depend on the type of the product, the technical complexity it entails and the other needed support to successfully and innovatively implement the idea. It will vary for mobile app development (Android or iOS), desktop application, website development, and so on.

Nevertheless, you must figure out how much you want to shell out and have the visibility about what you are actually paying for. This will further guide you in understanding and analyzing the hourly rates that would be required for designing and development.

Besides, the price will further differ if you decide to get the product made in-house or outsource another company that approaches a kind of product development process. 

Let’s hear your product idea! Drop us a line here and build your very own product with us.